Writing a desktop specific plugin
The following tutorial will demonstrate making a desktop-specific JBrowse plugin to run external tools such as bcftools and tabix on a VCF file.
Prerequisites
- git
- A stable and recent version of node
- yarn or npm
- basic familiarity with the command line, React, package management, and npm
bcftoolsinstalledbrew install bcftoolsorsudo apt install bcftoolstabixinstalledbrew install htsliborsudo apt install htslib
Why might I need a desktop-specific plugin
If you've developed a plugin before, you know that much of JBrowse 2's functionality can operate across both web and desktop instances of JBrowse. The main difference between the two applications has to do with JBrowse desktop's ability to run jobs on the machine it is running on, where web instances are beholden to the browser and the resources provided to it as a traditional web application.
JBrowse desktop utilizes electron to distribute the Javascript application as a cross-platform desktop application.
You might decide to build a desktop specific plugin if you need additional resources that are not distributed over the web to process data, if you need to run CLI operations, or otherwise run machine-specific tools through JBrowse.
Writing a desktop-specific plugin
In this tutorial, we are going to write a plugin that performs some of the file preparation steps outlined in the CLI tutorial. Specifically, our plugin will provide users with an interface to submit their file, the simple script will accept the file, then the script will run the appropriate operations against it, and then it will provide JBrowse with the files in an acceptable format. This kind of workflow can only be done on JBrowse desktop.
A completed version of this plugin can be found here if you get stuck following along.
Presently there is no formal procedure to differentiate desktop-specific plugins from universal plugins. Please include this information in the README of your repository if making a public-facing plugin, and follow the outlined steps for restricting plugin behaviour to desktop only.
Setup
Use git to clone the plugin template
The easiest way to start developing your plugin for JBrowse 2 is to use the plugin template.
To clone the plugin template project, on the command line run:
# change jbrowse-plugin-my-project to whatever you wish
git clone https://github.com/GMOD/jbrowse-plugin-template.git jbrowse-plugin-my-project
cd jbrowse-plugin-my-project
Initialize the project
To initialize your project run,
yarn init
You'll be asked a few questions relating to your new project.
Most fields can be left blank, but make sure to enter a descriptive name for your plugin in the first field.
A typical naming convention for JBrowse plugins is "jbrowse-plugin-", or, if you are going to publish to an NPM organization, we advise "@myscope/jbrowse-plugin-".
You also need to install the dependencies:
yarn # or npm i
Create a .jbrowse configuration file
To make things easier for testing, you're encouraged to make a simple .jbrowse configuration file.
It should look something like this:
myconfig.jbrowse
{
  "configuration": {
    "rpc": {
      "defaultDriver": "WebWorkerRpcDriver",
      "drivers": {
        "MainThreadRpcDriver": {},
        "WebWorkerRpcDriver": {}
      }
    },
    "logoPath": {
      "locationType": "UriLocation",
      "uri": ""
    }
  },
  "plugins": [
    {
      "name": "DesktopTools",
      "url": "http://localhost:9000/dist/jbrowse-plugin-desktop-tools.umd.development.js"
    }
  ],
  "assemblies": [
    {
      "name": "volvox",
      "aliases": ["vvx"],
      "sequence": {
        "type": "ReferenceSequenceTrack",
        "trackId": "volvox_refseq",
        "metadata": {
          "date": "2020-08-20"
        },
        "adapter": {
          "type": "TwoBitAdapter",
          "twoBitLocation": {
            "uri": "http://localhost:9000/volvox.2bit",
            "locationType": "UriLocation"
          }
        }
      },
      "refNameAliases": {
        "adapter": {
          "type": "FromConfigAdapter",
          "adapterId": "W6DyPGJ0UU",
          "features": [
            {
              "refName": "ctgA",
              "uniqueId": "alias1",
              "aliases": ["A", "contigA"]
            },
            {
              "refName": "ctgB",
              "uniqueId": "alias2",
              "aliases": ["B", "contigB"]
            }
          ]
        }
      }
    }
  ]
}
Ensure you change the assembly to one that coordinates with your own files, or use our testing file (unzip it to get the raw vcf) with the configuration as shown above. You can download the volvox sample assembly and place it in your root directory of your plugin running at localhost:9000.
Place your myconfig.jbrowse file somewhere convenient; we'll open it later.
Run JBrowse Desktop
Follow the developing with JBrowse web and desktop tutorial to create a running instance of JBrowse 2 desktop. The tutorial will also have you run your template plugin on the app to test.
Running CLI operations through JBrowse desktop
Creating the UI
We'll need some way to accept the file from the user through the JBrowse UI. Adding a new widget here is the same as doing it for a typical JBrowse plugin (see the simple JBrowse 2 plugin guide if you haven't already).
- Create a basic component and add it through the plugin manager
./src/MyToolWidget/MyToolWidget.tsx
import React from 'react'
import { AddTrackModel } from '@jbrowse/plugin-data-management'

export default function MyToolWidget({ model }: { model: AddTrackModel }) {
  // a very simple component to display for now
  return (
    <div>
      <p>
        This desktop plugin widget will allow you to submit an unindexed{' '}
        <code>.vcf</code> file to JBrowse which will then use a script to sort,
        index, and zip the file. This circumvents any CLI operations you may
        have otherwise needed to do!
      </p>
    </div>
  )
}
./src/MyToolWidget/index.tsx
import PluginManager from '@jbrowse/core/PluginManager'
import { AddTrackWorkflowType } from '@jbrowse/core/pluggableElementTypes'
import { types } from 'mobx-state-tree'

// locals
import MyToolWidget from './MyToolWidget'

export default (pluginManager: PluginManager) => {
  // this method of the pluginManager adds a dropdown menu item to the add track workflow
  // utilizing this method is useful for adding unique workflows to 'add track'
  pluginManager.addAddTrackWorkflowType(
    () =>
      new AddTrackWorkflowType({
        name: 'Raw variant track',
        ReactComponent: MyToolWidget,
        stateModel: types.model({}),
      }),
  )
}
- Add the widget to your plugin's index.ts
./src/index.ts
import Plugin from '@jbrowse/core/Plugin'
import PluginManager from '@jbrowse/core/PluginManager'
import { version } from '../package.json'
import { isElectron } from '@jbrowse/core/util'
import MyToolWidgetF from './MyToolWidget'

export default class DesktopToolsPlugin extends Plugin {
  name = 'DesktopToolsPlugin'
  version = version

  install(pluginManager: PluginManager) {
    // this method "isElectron" is very important for developing a desktop plugin
    if (isElectron) {
      MyToolWidgetF(pluginManager)
    }
  }

  configure() {}
}
It is critical to include the isElectron check before installing your plugin.
This method verifies that the process running the application is an electron app
(i.e. desktop), and our plugin will (eventually) crash JBrowse if it is
attempted to be run on web. By using this method where necessary, we ensure that
if an individual runs JBrowse with a config file that includes this plugin on
JBrowse web, the application will simply not install the plugin.
Try running your plugin as-is now:
yarn start your plugin, then, in your running instance of JBrowse desktop,
navigate: Open > select your myconfig.jbrowse file.
If you navigate
Add > Linear genome view > Open > Open track selector > + icon button > Add track
you should see your simple message display after selecting the "Raw variant
track" option in the dropdown.
We'll add some more UI elements that allow us to do something more interesting:
./src/MyToolWidget/MyToolWidget.tsx
import React, { useEffect, useState } from 'react'
import { Box, Button, FormControl, Paper, TextField, Typography } from '@mui/material'
import { makeStyles } from 'tss-react/mui'
import { getSession } from '@jbrowse/core/util'
import { AddTrackModel } from '@jbrowse/plugin-data-management'
import { LocalPathLocation, FileLocation, BlobLocation } from '@jbrowse/core/util/types'
import { getBlob, storeBlobLocation } from '@jbrowse/core/util/tracks'
import { isElectron } from '@jbrowse/core/util'

// adding some styling to our components
const useStyles = makeStyles()(theme => ({
  textbox: {
    width: '100%',
  },
  paper: {
    margin: theme.spacing(),
    padding: theme.spacing(),
  },
  submit: {
    marginTop: 25,
    marginBottom: 25,
    display: 'block',
  },
  filename: {
    marginLeft: theme.spacing(1),
  },
}))

// our widget component will need to be updated
export default function MyToolWidget({ model }: { model: AddTrackModel }) {
  const { classes } = useStyles()
  // controls the name state based on the file populated
  const [trackName, setTrackName] = useState(
    model.trackName !== '' ? model.trackName : `myvcf - ${Date.now()}`,
  )

  // changes the name state based on the file populated
  useEffect(() => {
    setTrackName(model.trackName)
  }, [model.trackData])

  return (
    { /* formatting using paper and other mui elements */ }
    <Paper className={classes.paper}>
      <p>
        This desktop plugin widget will allow you to submit an unindexed{' '}
        <code>.vcf</code> file to JBrowse which will then use a script to sort,
        index, and zip the file. This circumvents any CLI operations you may
        have otherwise needed to do!
      </p>
      { /* LocalFileChooser is a component we define below, it allows us to select local files only */ }
      <LocalFileChooser
        location={model.trackData}
        setLocation={model.setTrackData}
        setName={setTrackName}
      />
      { /* displays the track name and lets the user edit it to something they wish */ }
      <TextField
        value={trackName}
        onChange={event => setTrackName(event.target.value)}
        helperText="Track name"
      />
      { /* the submit button will eventually be responsible for executing our script */ }
      <Button variant="contained" className={classes.submit} onClick={() => {}}>
        Submit
      </Button>
    </Paper>
  )
}

function isBlobLocation(location: FileLocation): location is BlobLocation {
  return 'blobId' in location
}

// we're using a custom file chooser to ensure the user can only select local files
function LocalFileChooser(props: {
  location?: FileLocation
  setLocation: Function
  setName: Function
}) {
  const { classes } = useStyles()
  const { location, setLocation, setName } = props
  const [filename, setFilename] = useState(``)

  const needToReload =
    location && isBlobLocation(location) && !getBlob(location.blobId)

  return (
    <Box display="flex" flexDirection="row" alignItems="center">
      <Box>
        <FormControl fullWidth>
          <Button variant="outlined" component="label">
            Choose File
            <input
              key="bcftools-filechooser"
              type="file"
              hidden
              onChange={({ target }) => {
                const file = target && target.files && target.files[0]
                if (file) {
                  if (isElectron) {
                    // here we are setting the location information for the file selected
                    // these features are necessary for the VcfTabixAdapter
                    setLocation({
                      localPath: (file as File & { path: string }).path,
                      locationType: 'LocalPathLocation',
                    })
                  } else {
                    setLocation(storeBlobLocation({ blob: file }))
                  }
                  // these set ui elements
                  setFilename((file as File & { path: string }).path)
                  setName(file.name)
                }
              }}
            />
          </Button>
        </FormControl>
      </Box>
      <Box>
        <Typography
          component="span"
          className={classes.filename}
          color={filename ? 'initial' : 'textSecondary'}
        >
          {filename || 'No file chosen'}
        </Typography>
        {needToReload ? (
          <Typography color="error">(need to reload)</Typography>
        ) : null}
      </Box>
    </Box>
  )
}
Above, we added a component that allows us to select a local file for processing. Its information is propagated, and we have access to its data through the model.
In the onClick method of our Submit button, we want to execute our CLI
operations.
Setting up the script
To run a simple script, we're going to import the 'child_process' module from node:
./src/MyToolWidget/MyToolWidget.tsx
// ...
// place these somewhere above your components, below the imports
// we need to ensure we're running on electron to load in this node package
const exec = isElectron ? require('child_process').exec : () => {}

// runs the exec function
function execute(command: any, callback: any) {
  exec(command, (error: any, stdout: any, stderr: any) => {
    callback(stdout)
  })
}
// ...
Now, we can provide a command through the command parameter after the "Submit" button is clicked on our UI:
./src/MyToolWidget/MyToolWidget.tsx
// ...
onClick={() => {
  // a small utility function for error checking
  function isLocalPathLocation(
    location: FileLocation,
  ): location is LocalPathLocation {
    return 'localPath' in location
  }
  // we can determine the localpath from the data provided from the user submitting a file through the file selector
  // @ts-expect-error
  const localPath = isLocalPathLocation(model.trackData)
    ? model.trackData.localPath
    : ''

  // a simple command to be executed, showing us our localPath
  execute(
    `echo ${localPath}"`,
    (output: any) => {
      console.log(output)
    },
  )
}}
// ...
You can see how easy the execute function is to use now. Where we currently have
"echo ${localPath}" is where we're going to write our CLI commands.
If relevant when writing your own plugin, you can put any string of valid CLI commands here and your child process will execute them to the best of its ability.
Try refreshing your desktop instance and get the script to echo the localpath of your selected file.
Adding functionality to the script
For this plugin, the script we will run against the plain .vcf files provided through the JBrowse desktop UI will look like the following:
bcftools sort myfile.vcf > myfile.vcf.sorted.vcf
bgzip myfile.vcf.sorted.vcf
tabix myfile.vcf.sorted.vcf.gz
Remember to install these libraries (detailed in the prerequisites) before running your plugin operation. If a CLI operation cannot be executed, simply nothing happens.
./src/MyToolWidget/MyToolWidget.tsx
// ...
onClick={() => {
  // ...

  // we've updated our execute command to run our three CLI commands one after another
  execute(
    `bcftools sort "${localPath}" > "${localPath}.sorted.vcf" && bgzip "${localPath}.sorted.vcf" && tabix "${localPath}.sorted.vcf.gz"`,
    () => {
      // in our callback function, we process the data that has been populated
      model.setTrackData({
        localPath: `${localPath}.sorted.vcf.gz`,
        locationType: 'LocalPathLocation',
      })

      model.setIndexTrackData({
        localPath: `${localPath}.sorted.vcf.gz.tbi`,
        locationType: 'LocalPathLocation',
      })

      // after setting the relevant features in our model, we can add a new track
      // @ts-expect-error
      session.addTrackConf({
        trackId,
        type: 'VariantTrack',
        name: trackName,
        assemblyNames: [model.assembly],
        adapter: {
          type: 'VcfTabixAdapter',
          vcfGzLocation: model.trackData,
          index: { location: model.indexTrackData },
        },
      })
      // the following operations clear the widget and show the track to the user with the populated data
      model.view?.showTrack(trackId)

      model.clearData()
      // @ts-expect-error
      session.hideWidget(model)
    },
}}
// ...
Testing the plugin
Running the plugin on JBrowse desktop
We have all the necessary infrastructure to run our plugin completely now. If you haven't been testing and running your plugin along with the tutorial, remember you can run it with the following steps:
yarn serve # in the `~/jbrowse-components/products/jbrowse-desktop` directory
yarn develop # in another terminal tab in the same `~/jbrowse-components/products/jbrowse-desktop` directory
yarn start # in another terminal tab in your plugin `~/jbrowse-plugin-my-plugin/` directory, or similar
Then open your .jbrowse configuration file containing your plugin details, and
navigate to the Add track workflow.
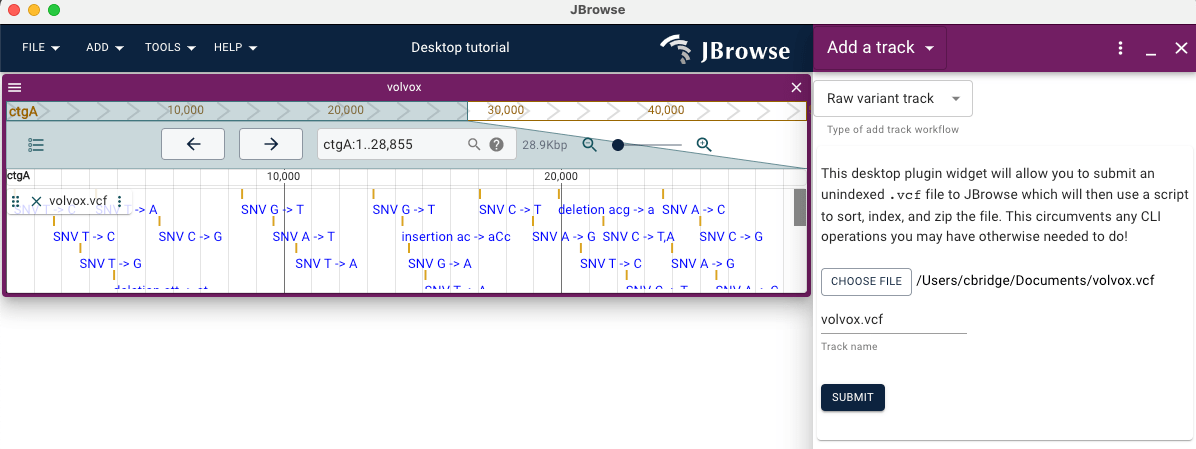
Try using our volvox raw vcf file and volvox assembly for testing if you do not have your own data.
Your final product should look something like the following:
Distributing the plugin
Distributing a desktop plugin is very similar to the publishing steps outlined in the simple plugin tutorial.
As stated before, we encourage you to clearly indicate when a plugin is intended for desktop use only, as desktop-only operations are likely to crash when used on a web application.
Next steps
After this tutorial you should have a general understanding of the capabilities and potential desktop-only workflows that can be developed for a plugin for JBrowse 2.
It should be reiterated that the functionality outlined in this tutorial is a simple example to get you started with working on more complicated workflows with more tools -- virtually anything you might do with a script or on the command line can be integrated into the JBrowse UI to streamline a workflow, for example, creating BigWig files from BAM/CRAM files with mosdepth, gunzip, and bedGraphToBigWig tools.
If you'd like some general development information, checkout the series of developer guides available.
Core takeaways
- developing a plugin specifically for desktop can allow you to run operations locally or on a private process through JBrowse to assist in data display or development
- the
isElectronfunction exported by@jbrowse/core/utilis critical in identifying codeblocks that can only be executed when running on JBrowse